
Making your own Cider
Winemaking Videos
I am often asked how to make cider with surplus apples. It's a relatively simple procedure, and although professional or semi-professional cider makers may wince at some of the paragraphs below, I make a palateable cider without too much effort and without an apple press. My main tool is the deepfreeze.
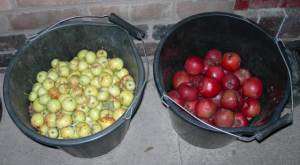
Firstly - you need under-ripe or otherwise sour apples, mainly, otherwise you won't get a very good cider. You also need apples with strong flavours. Bramley is ok; some eaters are ok if used in a mixture with sour apples if they have strong flavours (ribston, laxton, or anything really 'apple-ey'). Cider apples are obviously best, but few people have them. The picture shows a good mixture for the average gardener - a bucket of strong flavoured sharp eating apples, and another bucket full of crab apples; in my case, from a friend's garden.
The trouble with lists is that it's easy to miss stages out unintentionally, so don't follow this robotically - engage the brain. So... the instructions:
1. Pick up windfall apples, at least half of which should be sour (acidic): cookers or crabs or a mixture.. Wipe clean. Do not peel. Slice them up, discarding cores, brown patches, grubs and other undesirables. Place straight away into plastic bags. I do them in 1-lb lots, one pound to a bag. Put straight into the freezer and freeze them solid; this will take about 2 days. The freezing stage pulverises the apples very effectively.
If you do it on a rotation basis - picking up the windfalls each day, you'll soon have the freezer full of 1-lb bags of frozen apples. I find it useful to keep some of the sour apples separate from the others in case I need extra acid in stage 6 (below).
2.Begin the cidermaking. Get a lidded bucket. Put into it about five or six pints of cold water from the tap. Add four or perhaps five of your frozen 1-lb packs of apple and one pound of sugar.
3.Sprinkle in some yeast. Winemaking yeast is probably best, but it doesn't really matter; a teaspoonful or so. Then get a big wooden spoon and stir it round a little and leave overnight. Place it on a newspaper because you'll get condensation on the outside of the bucket.
(the amount of yeast is immaterial. its population will double every few hours for several days, until it reaches the maximum population which your bucket will support. if you add less, it just takes a day or two longer to get going)
4. Next morning, everything should have thawed out. Stir it around again.
ENSURE THAT THE BUCKET CONTAINS ENOUGH LIQUID TO MAKE ABOUT ONE GALLON OF CIDER.
5.Stir it carefully each day for several days. On about day 3 or 4 it will be fizzing, or should be.
Keep it in the kitchen if possible so it doesn't get too chilled and the yeast is kept happy.
6. After about a week, stir it around with your wooden spoon again and TASTE IT. (Use a tablespoon or wash the wooden spoon before re-immersing it in the brew). This gives you a first indication of whether you have added enough acid. If it is watery and bland, you need more sour apples, frozen solid as before. (I often use crab apples at this stage if I don't have enough cookers -perhaps 8 oz per gallon at a time, added in batches over several days, until it tastes fairly strong and appley. One year I used damsons - it tasted good but the cider was pink!).
7.Continue to stir every day or two. Now....as the sugar gets used up, you'll notice the taste getting drier and harsher. You can add a little more sugar to keep the brew 'alive' - say a couple of heaped tablespoonfuls each day - until you think 'right- the taste is starting to get quite pleasant...'.
(1lb per gallon makes a commercial strength cider. Add more sugar - up to 2lb in small portions - and you get a drink approaching the strength of a wine. The choice is yours.)
Keep the INSIDE top half of the bucket clean, also the lid - this is where bacteria will try to establish themselves. Use a paper towel for this.
8.After, say, two or three weeks, the sediment will be settling. When the taste is about right, put on some clean washing up gloves and extract by hand most of the skins and debris. Don't use a sieve; it's too slow. It's a four or five minute job. If you do it too slowly, trying to separate every last little bit of sediment, it will start to oxidise, which you don't want.
9. If it tastes really harsh, add a few tablespoonsful of sugar; then replace the lid and leave until the next day to let everything settle.
10.Then get a BIG funnel (not a small winemaking one) with a decent sized hole in the end so it doesn't block, put it in the top of a demijohn, and carefully, without disturbing all the gubbins in the bucket, pour off the liquid layer into the jar and add an air lock or similar. There will probably be a fairly large air gap at the top - that's fine.
11.Leave it for a few hours and it'll start to settle out.
12.The cider is now half made. It will probably froth a little after being transferred to the jar. When you're sure it's calmed down and isn't going to overflow onto the kitchen floor, you should top it up to the air lock. You could do this with water (it will dilute the cider-obviously) -or with some apple juice (better) or with some spare half-made cider from your previous or next batch. (i keep one batch separate for topping up purposes).
13.Leave it for a few days until most of the sediment has dropped. If sediment collects, it doesn't matter; you don't need to 'rack' cider like you do with wine. If it tastes bland or insipid add more acid (lemon juice will do) - though if you tasted it properly early on this shouldn't arise.
14. when you want to use it, get your bottles (PLASTIC screw- top; DO NOT USE GLASS), place a funnel in EACH or get a helper to move the funnel from bottle to bottle) - then carefully, without disturbing the sediment in the demijohn, smoothly pour the top layer off into all of the bottles in turn, taking care not to disturb the sediment in the jar you are pouring from. Do it in one smooth action. (You could actually decant into a second demijohn - then fill the bottles from that). If you stop / start, the sediment will be displaced. It's like decanting wine or homebrew beer. In each bottle leave a two inch air gap at the top.
15.Screw on the tops. Keep the bottles upright. Most years the cider is drinkable and palateable about 10 days later.
16.If you want 'still' cider, keep the tops loose OR do not bottle until the taste is DRY (all sugar gone - judge by taste).
17. If you want sweet fizzy cider, screw the tops on tight whilst the cider is still sweet. OR if all the sugar has disappeared, add a teaspoonful more sugar per bottle. For fizzy cider leave a two inch air gap at the top of each bottle. This makes opening fizzy cider much simpler. Drink when it has nicely pressurised.To use it, just slightly loosen the top and allow it to fizz gently until you're sure it won't overflow when you entirely remove the top.
18. The cider will clear pretty well in the bottle if not clear already.
19.Warning: do not use screw top glass bottles or corked glass bottles unless they are strongly reinforced to withstand pressure. Bottles of any sweet drink in screw topped glass containers can explode like grenades.
20.Hope I've not missed anything. Anyway, that should give you some idea. It sounds complicated, but it isn't. Cheers!
Copyright ND; updated 22 Aug 2015.
WINEMAKING VIDEOS: WINE FROM SURPLUS FRUIT
Rhubarb wine, part 1
Rhubarb wine, part 2
Rhubarb wine, part 3
Rhubarb wine, part 4
Rhubarb wine, part 5
Rhubarb wine, part 6
Loganberry wine, part 1
Loganberry wine, part 2
Loganberry wine, part 3
Loganberry pt 4 will return after editing.
Grape wine, part 1
Grape wine, part 2
big turbines
small turbines